Saturday, July 25, 2015

Spring 3.2.3 + Quartz 2.2.1 integration example (1) - configuration in Spring context XML

Recently, I am assigned a task of integrating Quartz into a Spring project. I find it's quite an interesting job and would like to share some of my findings.

Quartz is a very popular scheduling library and is used in many Java applications to run jobs. It is open source, simple to use and most importantly, it is free. Here is the Quartz website Quartz Scheduler.

In this post, I'd share how to integrate Quartz into Spring. And how to schedule some simple jobs using Spring's JobDetailFactory and MethodInvokingJobDetailFactory in a simple trigger and CRON trigger respectively.

Environment

Java 8
Maven 3
Spring 3.2.3
Quartz 2.2.2
SFL4J 1.7.9 (to show Quartz start up information)

Project configuration

Create a new Maven project and add the following dependencies to the pom file (Assume Java 8 and Maven 3 have already been installed).
   <dependencies>  
     <dependency>  
       <groupId>org.springframework</groupId>  
       <artifactId>spring-core</artifactId>  
       <version>${spring.version}</version>  
     </dependency>  
     <dependency>  
       <groupId>org.springframework</groupId>  
       <artifactId>spring-context-support</artifactId>  
       <version>${spring.version}</version>  
     </dependency>  
     <!-- Transaction dependency is required with Quartz integration -->  
     <dependency>  
       <groupId>org.springframework</groupId>  
       <artifactId>spring-tx</artifactId>  
       <version>${spring.version}</version>  
     </dependency>  
     <!-- Quartz framework -->  
     <dependency>  
       <groupId>org.quartz-scheduler</groupId>  
       <artifactId>quartz</artifactId>  
       <version>${quartz.version}</version>  
     </dependency>  
     <dependency>  
       <groupId>org.slf4j</groupId>  
       <artifactId>slf4j-api</artifactId>  
       <version>${slf4j.version}</version>  
     </dependency>  
     <dependency>  
       <groupId>org.slf4j</groupId>  
       <artifactId>slf4j-simple</artifactId>  
       <version>${slf4j.version}</version>  
     </dependency>  
   </dependencies>  
   <properties>  
     <spring.version>3.2.3.RELEASE</spring.version>  
     <quartz.version>2.2.1</quartz.version>  
     <slf4j.version>1.7.9</slf4j.version>  
   </properties>

Quartz job and trigger configuration

The first job class simply print a greeting message. I print the date time at the beginning of the greeting so we can know when the job is triggered by Quartz.

public class HelloWorldTask {

    public void sayHello() {
        System.out.println("[" + new Date() + "] Hello from Quartz! World");
    }
}
Then let's schedule the job into Quartz. Firstly, we need configure the JobDetail bean in Spring context file. We'll use the MethodInvokingJobDetailFacrotyBean, it allows to specify which class and which method in the class to run when the job is triggered. For details about MethodInvokingJobDetailFacrotyBean, please read the Spring docs.

   <bean id="helloWorldTask" class="com.geekspearls.quartz.task.HelloWorldTask"/>
   
   <bean id="helloWorldJob"  
      class = "org.springframework.scheduling.quartz.MethodInvokingJobDetailFactoryBean">  
     <property name="targetObject" ref="helloWorldTask"/>  
     <property name="targetMethod" value="sayHello"/>  
   </bean>

Secondly, we need to add our job to a trigger. We will use the SimpleTriggerFactoryBean to schedule our first job and set the job to be run every 5 seconds and delay 1 second to start. For details about SimpleTriggerFactoryBean, please read the Spring docs.

  <bean id="simpleTrigger"  
      class="org.springframework.scheduling.quartz.SimpleTriggerFactoryBean">  
     <property name="jobDetail" ref="helloWorldJob" />  
     <property name="repeatInterval" value="5000" />  
     <property name="startDelay" value="1000" />  
   </bean>  

Then let's create our second job. The second job class extends QuartzJobBean interface. When it is triggered, executeInternal method will be invoked. Inside the method, it takes the value of 'name' from JobDataMap which we set in the jobDetails configuration and print a greeting message. The date time will also be printed out so we can know when the job is triggered.

public class SayHelloTask extends QuartzJobBean {
    @Override
    protected void executeInternal(JobExecutionContext jobExecutionContext) throws JobExecutionException {
        String name = jobExecutionContext.getMergedJobDataMap().getString("name");
        System.out.println("[" + new Date() + "] Hello from Quartz! " + name);
    }
}

For our second job, we will use the JobDetailFactoryBean to configure it in Spring context file and pass in a value of 'name' into jobDataMap.
  <bean id="sayHelloJob"  
      class="org.springframework.scheduling.quartz.JobDetailFactoryBean">  
     <property name="jobClass" value="com.geekspearls.quartz.task.SayHelloTask"/>  
     <property name="jobDataAsMap">  
       <map>  
         <entry key="name" value="Geek's pearls reader"/>  
       </map>  
     </property>  
     <property name="durability" value="true"/>  
   </bean> 

Then we schedule this job with CronTriggerFactoryBean. It is scheduled to run every 10 seconds start from every 0 second. For details about CRON, please read Quartz CronTrigger Tutorial
  <bean id="cronTrigger"  
      class="org.springframework.scheduling.quartz.CronTriggerFactoryBean">  
     <property name="jobDetail" ref="sayHelloJob" />  
     <property name="cronExpression" value="0/10 * * * * ?"/>  
   </bean> 

Now, we have our jobs and triggers ready. Let's add them into Quartz scheduler.
   <bean class="org.springframework.scheduling.quartz.SchedulerFactoryBean">  
     <property name="jobDetails">  
       <list>  
         <ref bean="helloWorldJob" />  
         <ref bean="sayHelloJob" />  
       </list>  
     </property>  
     <property name="triggers">  
       <list>  
         <ref bean="simpleTrigger" />  
         <ref bean="cronTrigger" />  
       </list>  
     </property>  
   </bean>

Finally, everything is ready. The completed Spring context XML file is below.
   <beans xmlns="http://www.springframework.org/schema/beans"  
     xmlns:xsi="http://www.w3.org/2001/XMLSchema-instance"  
     xsi:schemaLocation="http://www.springframework.org/schema/beans http://www.springframework.org/schema/beans/spring-beans-3.2.xsd">  
   <bean id="sayHelloJob"  
      class="org.springframework.scheduling.quartz.JobDetailFactoryBean">  
     <property name="jobClass" value="com.geekspearls.quartz.task.SayHelloTask"/>  
     <property name="jobDataAsMap">  
       <map>  
         <entry key="name" value="Geek's pearls reader"/>  
       </map>  
     </property>  
     <property name="durability" value="true"/>  
   </bean>  
   <bean id="helloWorldTask" class="com.geekspearls.quartz.task.HelloWorldTask"/>  
   <bean id="helloWorldJob"  
      class = "org.springframework.scheduling.quartz.MethodInvokingJobDetailFactoryBean">  
     <property name="targetObject" ref="helloWorldTask"/>  
     <property name="targetMethod" value="sayHello"/>  
   </bean>  
   <bean id="simpleTrigger"  
      class="org.springframework.scheduling.quartz.SimpleTriggerFactoryBean">  
     <property name="jobDetail" ref="helloWorldJob" />  
     <property name="repeatInterval" value="5000" />  
     <property name="startDelay" value="1000" />  
   </bean>  
   <bean id="cronTrigger"  
      class="org.springframework.scheduling.quartz.CronTriggerFactoryBean">  
     <property name="jobDetail" ref="sayHelloJob" />  
     <property name="cronExpression" value="0/10 * * * * ?"/>  
   </bean>  
   <bean class="org.springframework.scheduling.quartz.SchedulerFactoryBean">  
     <property name="jobDetails">  
       <list>  
         <ref bean="helloWorldJob" />  
         <ref bean="sayHelloJob" />  
       </list>  
     </property>  
     <property name="triggers">  
       <list>  
         <ref bean="simpleTrigger" />  
         <ref bean="cronTrigger" />  
       </list>  
     </property>  
   </bean>  
 </beans>

Now, let's test it! Run the following class as Java application.
public class HelloWorld {
    public static void main(String[] args) {
        ApplicationContext context = new ClassPathXmlApplicationContext("applicationContext.xml");
        System.out.println("Application started [" + new Date() + "]");
    }
}

In the log and console output, we can see the information below. Firstly, it tells us a Quartz scheduler with instanceId 'NON_CLUSTER' running locally with 10 threads. And it doesn't support persistence and cluster. I will share how to use clustered Quartz scheduler in my next post.
[main] INFO org.quartz.core.QuartzScheduler - Scheduler meta-data: Quartz Scheduler (v2.2.1) 'org.springframework.scheduling.quartz.SchedulerFactoryBean#0' with instanceId 'NON_CLUSTERED'
  Scheduler class: 'org.quartz.core.QuartzScheduler' - running locally.
  NOT STARTED.
  Currently in standby mode.
  Number of jobs executed: 0
  Using thread pool 'org.quartz.simpl.SimpleThreadPool' - with 10 threads.
  Using job-store 'org.quartz.simpl.RAMJobStore' - which does not support persistence. and is not clustered.

Then we can see the application is started at 17:14:23. 1 second later, our first job is triggered and repeated every 5 seconds. At 17:14:30, our second job is triggered and repeated every 10 seconds. That's what we expected! The completed example can be found on my GitHub here. I hope you will enjoy it!
Application started [Sat Jul 25 17:14:23 AEST 2015]
[Sat Jul 25 17:14:24 AEST 2015] Hello from Quartz! World
[Sat Jul 25 17:14:29 AEST 2015] Hello from Quartz! World
[Sat Jul 25 17:14:30 AEST 2015] Hello from Quartz! Geek's pearls reader
[Sat Jul 25 17:14:34 AEST 2015] Hello from Quartz! World
[Sat Jul 25 17:14:39 AEST 2015] Hello from Quartz! World
[Sat Jul 25 17:14:40 AEST 2015] Hello from Quartz! Geek's pearls reader
[Sat Jul 25 17:14:44 AEST 2015] Hello from Quartz! World
[Sat Jul 25 17:14:49 AEST 2015] Hello from Quartz! World
[Sat Jul 25 17:14:50 AEST 2015] Hello from Quartz! Geek's pearls reader
[Sat Jul 25 17:14:54 AEST 2015] Hello from Quartz! World
[Sat Jul 25 17:14:59 AEST 2015] Hello from Quartz! World
[Sat Jul 25 17:15:00 AEST 2015] Hello from Quartz! Geek's pearls reader
[Sat Jul 25 17:15:04 AEST 2015] Hello from Quartz! World
[Sat Jul 25 17:15:09 AEST 2015] Hello from Quartz! World
[Sat Jul 25 17:15:10 AEST 2015] Hello from Quartz! Geek's pearls reader
[Sat Jul 25 17:15:14 AEST 2015] Hello from Quartz! World
[Sat Jul 25 17:15:19 AEST 2015] Hello from Quartz! World
[Sat Jul 25 17:15:20 AEST 2015] Hello from Quartz! Geek's pearls reader
[Sat Jul 25 17:15:24 AEST 2015] Hello from Quartz! World
[Sat Jul 25 17:15:29 AEST 2015] Hello from Quartz! World
[Sat Jul 25 17:15:30 AEST 2015] Hello from Quartz! Geek's pearls reader
[Sat Jul 25 17:15:34 AEST 2015] Hello from Quartz! World
[Sat Jul 25 17:15:39 AEST 2015] Hello from Quartz! World
[Sat Jul 25 17:15:40 AEST 2015] Hello from Quartz! Geek's pearls reader
...

Monday, June 29, 2015

Git with Eclipse (4) - pushing local repositories to remote repositories

This post describes how to create a remote repository at GitHub and how to push a local repository to remote repository at GitHub using EGit.


Create a repository at GitHub

Firstly, we need a remote repository to start. I will use GitHub to host our remote repository. Sign up from here to get an account at GitHub. After sign in, click the  icon and select New repository.
In the next screen, give a name "HelloWorld" to our repository. You can also write a brief description about the repository, so other people will know what is your repository about. Choose Public as the repository type, so it can be accessed by anyone with restriction on modification. Private repository is available to paid users. If you tick Initialize this repository with a README, GitHub will create a read me file in the repository. We leave it as it is so we will have a clean repository. Then click the Create repository button and our HelloWorld repository is created.

In the next screen, you can see the HelloWorld repository is empty and GitHub provides several suggestions to start with. We will leave it for now and go back to HelloWold project in Eclipse.

SSH configuration

If you are going to use SSH protocol instead of HTTP for read and write access to the remote repository at GitHub, you have to configure the SSH key in Eclipse and GitHub.

Eclipse SSH configuration

Open Eclipse Preferences via Windows -> Preferences. Then go to General -> Network Connections -> SSH2. Select Key Management tab and click the Generate RSA Key... button. Eclipse will generate a public key (Copy the public key to a text file and it will be uploaded to GitHub later). Then enter a pass phrase in Passphrase: and Confirm passphrase: fields, it will be used to protect the private key. Click the Save Private Key... button to save the private key in your computer (usually it is saved in C:\Users\<username>\.ssh). Then go to General tab and enter the path of the private key (usually is C:\Users\<username>\.ssh) in SSH2 home: field. Click Apply button to save the configuration.

GitHub SSH configuration

Log in to GitHub. Then click the icon on the top right of the screen and select Settings in the menu. Choose SSH Keys in the navigator on the left. Then click Add SSH Key button and paste the Eclipse generated public key into the Key text box. Title field is optional.

Click Add key button and you will be asked to confirm your password. After the password is confirmed, the public key is added to GitHub. Now you are able to use SSH protocol to access your repositories at GitHub.

Push the local repository to remote repository

Firstly, we need a local repository to push. Create the HelloWorld project in Eclipse and share it in a local Git repository. Please refer to Git with Eclipse (3) - basic use cases in EGit with local repository for how to share project in local repository.

Secondly, because we created an empty repository at GitHub in previous step, we need to create a branch in the remote repository. Open Git perspective in Eclipse by selecting Windows -> Open Perspective -> Other....in the menu, then choose Git in the opened dialog.

In the Git perspective, expand HelloWorld repository, right click on Remotes and select Create Remote... In the menu.

Give a remote name in the opened dialog (Usually is origin by default) and select Configure push, then click OK.


The Configure Push dialog asks for the URI of the remote repository. we can copy the URI from HelloWorld repository at GitHub (we will use SSH URI in our example). Log in to GitHub and open HelloWorld repository. In the top section of the page, click on SSH and click theicon to copy the SSH URI.

Then go back to Eclipse. Click the Change... button in Configure Push dialog and paste the SSH URI into the URI: field in the opened Destination Git Repository dialog. Select ssh in the Protocol: field. Authentication Users: is git. Leave the rest as what it is and click Finish. You will be asked for the pass phrase. Enter the pass phrase you have set up in the SSH configuration and click OK.

Then click Save and Push button in Configure Push dialog.


A confirmation window will be shown once the repository is pushed to GitHub successfully.

Click OK to close the window. Log in to GitHub and open HelloWorld repository. You will see the HelloWorld project is now available at GitHub.

Now the HelloWorld project is ready to be forked or collaborated by other contributors. Also, you can fetch any updates in the HelloWorld project from GitHub and push your changes in HelloWorld project to GitHub. For how to clone a remote repository and fetch/push changes. Please read Git with Eclipse (5) - work with remote repositories (coming soon...).


Reference:


Friday, June 19, 2015

Sorting algorithm - Heap Sort

Recall that selection sort algorithm which sorts by finding the minimum element from the unsorted part and put it at the front (Selection Sort). Similarly, it will work if we find the maximum element from the unsorted part and put it at the end. However, the time complexity of selection sort is \(\Theta(n^2)\). Interestingly, the time complexity can be improved substantially if a right data structure is used. Binary heap is a such data structure.


Binary heap

Binary heap is an almost-complete binary tree with each node satisfying the heap property: If v and p(v) are a node and its parent, then the key of the item stored in p(v) is not less (or greater) than the key of the item stored in v. The former is called as max heap and the latter is called as min heap.

A binary heap T with n nodes can be represented by an array H[1..n] as following:

  • The root of T is stored in H[1].
  • The left child of a node H[i] is stored in H[2j] and the right child is stored in H[2j+1].
  • The parent of a node H[i] is stored in \(H[\lfloor \frac j 2 \rfloor]\).
Below is a max binary heap and its array representation.


Operations on heap

A heap data structure normally supports the following operations:

  • peek(): Retrieve, but don't remove the root element of the heap.
  • poll(): Retrieve and remove the root element of the heap.
  • insert(e): Insert an element into the heap.
  • delete(i): Delete the ith element from the heap.
  • makeHeap(A): Transform array A into a heap.
And there are two basic operations that are used to implement the above operations:
  • shiftUp(i): Move the ith element up in the heap if the key of the element is greater than the key of its parent.
  • shiftDown(i): Move the ith element down in the heap if the key of the element is less than the key of its children.
note: The above operations are for max heap. It is easy to modify them to be used for min heap.

To implement heap sort algorithm, only shiftDown(i) and makeHeap(A) operations are needed. The other operations will not be described here. The pseudo code of the two operations are described in ShiftDown and MakeHeap. (Note: for simplicity, instead of 0 to n-1, we use 1 to n as the indices of the heap)

Algorithm 5.1 ShiftDown
Input: An array A[1..n] and an index i between 1 and n.
Output: A[i] is moved down so it is not smaller than its children.
  1. done = false
  2. if 2i > n then exit {comment: node i has no children}
  3. repeat
  4.     i = 2i
  5.     if \({i+1} \le n\) and key(A[i+1]) > key(A[i]) then
  6.         i = i + 1 {comment: use right child if its key is greater than the left child}
  7.     end if
  8.     if key(\(A[\lfloor \frac i 2 \rfloor]\)) < key(A[i]) then
  9.         swap \(A[\lfloor \frac i 2 \rfloor]\) and A[i]
  10.     else done = true
  11.     end if
  12. until 2i > n or done
Algorithm 5.2 MakeHeap
Input: An array A[1..n] of n elements
Output: A[1..n] is transformed into a heap

  1. for i = \(\lfloor \frac n 2 \rfloor\) to 1
  2.     ShiftDown(A, i)
  3. end for

Heap Sort

As in the heap data structure, the maximum (or minimum) element is the root of the heap. If we choose to use the min heap, poll() operation will give us the root of the heap which is the minimum element. So given an array A[1..n], we can sort it in non-decreasing order as follows. First, transform the array into a min heap. Next, for i = 1 to n, call the poll() operation on the min heap and store the element in A[i]. However, we need extra space to store the min heap in this approach. As stated earlier, we can use ShiftDown and MakeHeap to sort the array in place. First, we transform the array A[1..n] into a max heap, then the maximum element is in A[1]. Next, swap A[1] and A[n] so that A[n] is the maximum element in the array. Now, A[1] may be smaller than its children. Therefore, call ShiftDown(A[1..n-1], 1) to transform A[1..n-1] to a max heap. Next, swap A[1] and A[n-1] and transform A[1..n-2] into a max heap. Repeat the procedure until the heap size becomes to 1 which A[1] is the minimum element. The pseudo code is described in HeapSort.

Algorithm 5 HeapSort
Input: An array A[1..n] of n elements.
Output: A[1..n] sorted in non-decreasing order.

  1. MakeHeap(A)
  2. for i = n to 1
  3.     swap A[1] and A[i]
  4.     ShiftDown(A[1..i-1], 1)
  5. end for
A JAVA implementation of this algorithm can be found on GitHub HeapSort.

Time complexity

Let T be the heap of the array A[1..n]. Because T is an almost-complete binary tree, the height of the tree \(h = \lfloor logn \rfloor\). It is easy to observe that the maximum number of comparison performed by ShiftDown happens when move the root element down to the leaf level, so the number of comparison is at most 2(h-1) = 2logn - 2. So the time complexity of ShiftDown is O(logn).

If we move down the ith element in heap A[1..n], the time complexity of ShiftDown is analysed as following. The level of ith element in the tree \(l = \lfloor logi \rfloor\). It is easy to observe that the number of comparison performed by ShiftDown is at most 2(h - l). Since there are \(2^l\) nodes on level l, \(0 \le l \lt h\), the total number of comparison performed by MakeHeap is 
$$\begin{align} \sum\limits_{l=0}^{h-1}(h-l){2^l} & =2^0(h) + 2^1(h-1) + 2^2(h-2) + \cdots + 2^{k-1}(1) \\ & = 1(2^{h-1}) + 2(2^{h-2}) + \cdots + h(2^{h-h}) \\ & = \sum\limits_{i=1}^{h}i2^{h-i} \\ & =2^h\sum\limits_{i=1}^{h} \frac i {2^i} \\ & \le n\sum\limits_{i=1}^{h} \frac i {2^i} \\ & \lt 2n \\ \end{align}$$
The last second equality is because \(2^h \le n\) in an almost-complete binary tree. The last equality follows the geometric series
$$\sum\limits_{i=0}^n c^i = \frac {c^{n+1}-1} {c-1}$$
Differentiating both side of above equation and multiplying by c yields
$$\sum\limits_{i=0}^n ic^i = \frac {nc^{n+2}-nc^{n+1}-c^{n+1}+c} {(c-1)^2}$$ 
Let c = 1/2 yieds
$$\sum\limits_{i=0}^n \frac i {2^i} = 2 - \frac {n+2}{2^n} \lt 2$$
Thus, the time complexity of MakeHeap is O(n).

Based on the above, the time complexity of HeapSort algorithm is calculated as following. The number of comparison performed by MakeHeap at step 1 is \(\le 2n\). The number of comparison performed by ShiftDown at step 4 is \(\lt (n-1)logn\). Thus, the time complexity of HeapSort is
$$C(n) \lt 2n + (n-1)logn = O(nlogn)$$


Reference:
Algorithm Design Techniques and Analysis by M.H. Alsuwaiyel

Sunday, June 14, 2015

Sorting algorithm - Merge Sort and Quick Sort

In this post, I will introduce two divide-and-conquer sorting algorithms - Merge Sort and Quick Sort.


Merge Sort
The merge sort algorithm divides input array in two halves and sort the two sub arrays respectively, then merge them to get the desired sorted array. As to the sorting method used for each half, merge sort algorithm use itself recursively.

Let A[0..n] be an array of n elements. The merge sort algorithm divides A to A[0..\(\frac n 2\)] and A[\(\frac n 2+1\)..n]. And it performs itself on the two sub arrays to make them sorted. Then it merges two sub arrays to get A[0..n] sorted. The diagram from Wikipedia illustrates the process of merge sort algorithm.


The pseudo code is described in MergeSort.

Algorithm 3 MergeSort
Input: An array A[0..n] of n elements.
Output: A[0..n] sorted in non-decreasing order.

  1. mergesort(A, 0, n)
Function mergesort(A, low, high)


  1. if low < high
  2.     mid = (low + high)/2
  3.     mergesort(A, low, mid)
  4.     mergesort(A, mid+1, high)
  5.     merge(A, low, mid, high)
  6. end if
Function merge(A, p, q, r)
Input: An array A[0..n] and three indices p, q and r with \(0 \le p \le q \lt r \le n\). Both sub arrays A[p..q] and A[q+1..r] are sorted in non-decreasing order.
Output: A[p..r] contains the elements from A[p..q] and A[q+1..r] sorted in non-decreasing order.
  1. B[p..r] is an auxiliary array
  2. i = p, j = q+1, k = p
  3. while (\(i \le q\)) and (\(j \le r\))
  4.     if A[i] < A[j] then
  5.         B[k] = A[i]
  6.         i = i + 1
  7.     else
  8.         B[k] = A[j]
  9.         j = j + 1
  10.     end if
  11.     k = k + 1
  12. end while
  13. if \(i \le q\) then
  14.     B[k..r] = A[i..q]
  15. end if
  16. if \(j \le r\) then
  17.     B[k..r] = A[j..r]
  18. end if
  19. A[p..r] = B[p..r]

A JAVA implementation of this algorithm can be found on GitHub Merge Sort.

Time complexity
The basic operation of merge sort algorithm is element comparison. Let C(n) be the number of element comparisons. For simplicity, assume n is a power of 2. If n = 1, C(n) = 0 because the algorithm does not perform any element comparison. If n > 1, in function mergesort(A, low, high), step 3 and step 4 perform C(\(\frac n 2\)) element comparisons. And step 5 calls function merge(A, p, q, r). It is easy to see the number of element comparison performed by function merge is between \(\frac n 2\) and n - 1. Thus, the minimum number of comparison is 

$$C(n) = \begin{cases}0 & n=1 \\ 2C(\frac n 2) + \frac n 2 & n \ge 2 \end{cases}$$

Proceed to solve the recurrence by expansion as follows. Note: we assume \(n=2^k\).

$$\begin{align}C(n) & = 2C(\frac n 2) + \frac n 2 \\ & = 2^2C(\frac n {2^2}) + 2\frac n 2 \\ & = ... \\ & = 2^kC(\frac n {2^k}) + k\frac n 2 \\ & = 2^kC(1) + k\frac n 2 \\ & = \frac {nlogn} 2\end{align}$$

The maximum number of comparison is 

$$C(n) = \begin{cases}0 & n=1 \\ 2C(\frac n 2) + n - 1 & n \ge 2 \end{cases}$$

Proceed to solve the recurrence by expansion as follows. Note: we assume \(n=2^k\).

$$\begin{align}C(n) & = 2C(\frac n 2) + n - 1 \\ & = 2^2C(\frac n {2^2}) + 2n - 2 - 1 \\ & = ... \\ & = 2^kC(\frac n {2^k}) + kn - 2^k-1 - 2^k-2 - ... - 2 - 1 \\ & = 2^kC(1) + kn - \sum\limits_{i=0}^{k-1} 2^i \\ & = kn - 2^k + 1 \\ & = nlogn - n + 1\end{align}$$


According to the analysis above, The time complexity of merge sort algorithm is \(C(n)=\Omega(nlogn) = O(nlogn) = \Theta(nlogn)\)

Quick Sort
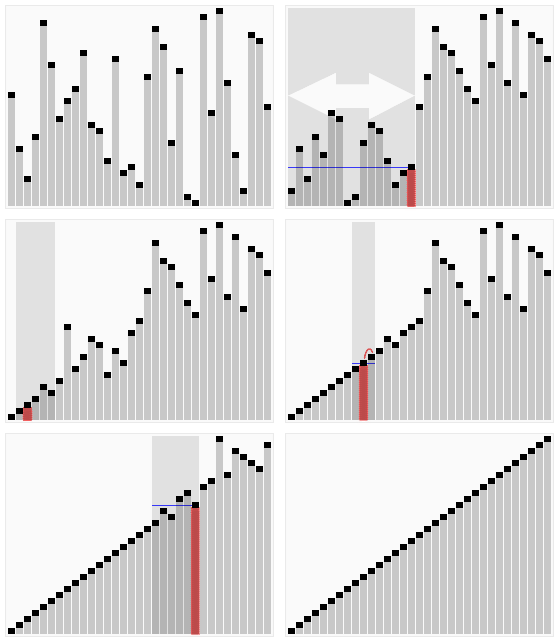
The quick sort algorithm is another divide-and-conquer sorting algorithm. It divides the input array by a chosen pivot, so that all elements smaller than the pivot are at the left of it and all greater elements are at the right. This procedure is called partitioning or splitting. An important observation is that after splitting the array by the pivot, the pivot is in its correct position. Recursively perform the same splitting procedure on each side of the pivot until all elements are in their correct position, the array therefore is sorted. There are many different ways to choose a pivot in the array, here I will pick the first element as the pivot. However, it leads to quadratic running time in the worst case by always picking the first element as the pivot. This will be discussed later in the time complexity analysis of quick sort algorithm. The animation below from Wikipedia illustrates the idea of quick sort algorithm.


The pseudo code is described in QuickSort.

Algorithm 4 QuickSort
Input: An array A[0..n] of n elements.
Output: A[0..n] sorted in non-decreasing order.

  1. quicksort(A, 0, n)
Function quicksort(A, low, high)
  1. if low < high then
  2.     w = split(A, low, high)
  3.     quicksort(A, low, w-1)
  4.     quicksort(A, w+1, high)
  5. end if
Function split(A, low, high)
Input: An array A[0..n] and two indices low and high with \(0 \le low < high \le n\).
Output: An index w with \(low \le w \le high\). And w is the correct position of A[low] in A[low..high].
  1. i = low
  2. x = A[low]
  3. for j = i + 1 to high
  4.     if A[j] < x then
  5.         i = i + 1
  6.         if \(i \ne j\) then swap A[i] and A[j] comment: move the smaller element to the left
  7.     end if
  8. end for
  9. swap A[low] and A[i] comment: i is the correct position of A[low]
  10. return i

A JAVA implementation of this algorithm can be found on GitHub Quick Sort.

Time complexity

The average case scenario
The time complexity of quick sort algorithm depends on the relative order of the elements in the input array. To analyse the average behavior of the algorithm, assume the distribution of each element in the input array is equally likely. Let C(n) be the number of elements comparisons performed by the quick sort algorithm. It is easy to see the number of elements comparison performed by split in step 2 is high - low - 1, which is n - 1 for high = n, low = 0. The recursive call in steps 3 and 4 cost C(w-1) and C(n-w). Based on the assumption of each element is equally likely to be the first element of the input array and thus chosen as the pivot, the probability that any element be the pivot is 1/n. Hence, the total number of comparison is
$$C(n) = (n-1) + \frac {1} {n} \sum\limits_{w=1}^n(C(w-1) + C(n-w))$$
Since
$$\sum\limits_{w=1}^nC(n-w)=C(n-1)+C(n-2)+...+C(0)=\sum\limits_{w=1}^nC(w-1)$$
Thus
$$C(n)=(n-1) + \frac {2} {n} \sum\limits_{w=1}^nC(w-1)$$
Multiply the equation by n
$$nC(n)=n(n-1) + 2\sum\limits_{w=1}^{n}C(w-1)$$
Replace n by n-1
$$(n-1)C(n-1)=(n-1)(n-2) + 2\sum\limits_{w=1}^{n-1}C(w-1)$$
Subtracting the above two equations
$$nC(n) - (n-1)C(n-1)=2(n-1) + 2C(n-1)$$
Rearrange  the equation yields
$$\frac {C(n)} {n+1} = \frac {C(n-1)} {n} + \frac {2(n+1)} {n(n+1)}$$
Let \(D(n) = \frac {C(n)} {n+1}\)
$$D(n) = D(n-1) + \frac {2(n+1)} {n(n+1)}$$
Resolve the above equation
$$D(n) = 2\sum\limits_{i=1}^n\frac{i-1}{i(i+1)}=2\sum\limits_{i=1}^n\frac 1 j - \frac {4n} {n+1}=2lnn - \Theta(1)=\frac 2 {log e}log n-\Theta(1) \approx 1.44log n$$
Consequently,
$$C(n) = (n+1)D(n) \approx 1.44nlogn = \Theta(nlogn)$$

The worst case scenario
Suppose that in every call to quicksort, the pivot which is A[low], is the smallest element in the array. It results the w returned by split is equal to low. Then the next recursive calls will be quicksort(A, 0, -1) and quicksort(A, 1, n), and quicksort(A, 0, -1) will do nothing. Thus, if the input array is already sorted in non-decreasing order, the call sequence to quicksort is below:

quicksort(A, 0, n), quicksort(A, 1, n), ... , quicksort(A, n-1, n), quicksort(A, n, n)

These result in calls to split as following:

split(A, 0, n), split(A, 1, n), ... , split(A, n-1, n), split(A, n, n)

The number of elements comparison performed by split is high - low - 1. Thus, the total number of comparison done by quick sort algorithm in the worst case is
$$(n-1) + (n-2) + ... + 1 + 0 = \frac {n(n-1)} 2 = \Theta(n^2)$$
The scenario above however is not the only case that results in quadratic running time. If the algorithm always picks the smallest k elements with k is sufficiently small relative to n, the running time of quick sort algorithm is also quadratic. This can be improved to \(\Theta(nlogn)\) by always picking the median element as the pivot which splits the input array in balance. But the time complexity of the median finding algorithm needs to be considered carefully. Another approach to improve the quick sort algorithm is to choose the pivot randomly which will result in a very efficient algorithm. It will be discussed in my future post.


Reference:
Algorithm Design Techniques and Analysis by M.H. Alsuwaiyel

Monday, June 8, 2015

Sorting algorithm - Selection Sort and Insertion Sort

This post will introduce two simple sorting algorithms - Selection Sort and Insertion Sort.


Selection Sort

The selection sort algorithm sorts an array by finding minimum element from unsorted part of the array and putting it at the front of the unsorted part.

Let A[0..n] be an array of n elements. The selection sort algorithm sorts the elements in A as follows. First, it finds the minimum element and store it in A[0]. Next, it finds the minimum of the remaining n-1 elements and store it in A[1]. It continues until A is sorted. The pseudo code  is described in SelectionSort.

Algorithm 1 SelectionSort

Input: An array A[0..n] of n elements
Output: A[0..n] sorted in non-decreasing order

  1. for i = 0 to n
  2.     k = i
  3.     for j = i + 1 to n
  4.         if A[j] < A[k] k = j
  5.     end for
  6.     if \(i \neq k\) then swap A[i] and A[k]
  7. end for
A JAVA implementation of this algorithm can be found on GitHub - Selection Sort

Time complexity 
The basic operation of this algorithm is the element comparison in step 4. It is easy to see the number of element comparison performed by selection algorithm is $$ \sum\limits_{i=0}^n (n-i) = n + (n-1) + (n-2) + ... + 1 = \sum\limits_{i=1}^n i = \frac{n(n-1)}{2}$$
It is easy to see the number of element comparison performed by selection sort algorithm is always \(\frac{n(n-1)}{2}\) regardless of how the input array are ordered. Thus, the time complexity is \(\Theta(n^2)\).


Insertion Sort

The insertion sort algorithm sorts an array by inserting one element from the unsorted part of the array into the right position of the sorted part. It works the way of sorting cards in our hands.

Let A[0..n] be an array of n elements. The insertion sort algorithm sorts the elements in A as follows. We begin with the sub array of the first element A[0]. Apparently, A[0] is already sorted because there is only one element. Next, A[1] is inserted before A[0] if it is smaller than A[0], otherwise, A[1] is inserted after A[0]. Continuing this way, A[i] is inserted in the sorted sub array A[0..i-1]. This is done by comparing A[i] to A[i-1] down to A[0] until an element is less than or equal to A[i] is found. If A[j] (j = i-1 to 0) is greater than A[i], shift A[j] to A[j+1]. A[i] is then inserted at the position after the found element. The pseudo code is described in InsertionSort.

Algorithm 2 InsertionSort
Input: An array A[0..n] of n elements
Output: A[0..n] sorted in non-decreasing order


  1. for i = 0 to n
  2.     x = A[i]
  3.     j = i - 1
  4.     while (\(j\ge0\)) and (A[j] > x)
  5.         A[j+1] = A[j]
  6.         j = j - 1
  7.     end while
  8.     A[j+1] = x
  9. end for
A JAVA implementation of this algorithm can be found on GitHub - Insertion Sort.

Time complexity
Unlike selection sort algorithm, the number of element comparison performed by insertion sort algorithm depends on the order of the input array. If the input array is already sorted in non-decreasing order, the number of element comparison is n - 1, because the element A[i] is compared with A[i-1] only. On the other hand, if the input array is already sorted in decreasing order, the number of element comparison is $$ \sum\limits_{i=0}^{n}i = \frac{n(n-1)}{2} $$
As stated above, the number of element comparison performed by insertion sort is between n - 1 and \(\frac{n(n-1)}{2}\). The time complexity can be described using the O-notation as O(\(n^2\)).


Based on the discussion above, we can see that the insertion sort algorithm performs better than selection sort algorithm if the input array is not sorted in decreasing order already. But the time complexity of both algorithms is O(\(n^2\)).

Reference:
Algorithm Design Techniques and Analysis by M.H. Alsuwaiyel

Saturday, May 30, 2015

Git with Eclipse (3) - basic use cases in EGit with local repository

This post introduces indexing files (stage), committing files and reverting changes in local repository with EGit. Here assume the project has already been shared to Git local repository. For how to share a project to Git local repository, please read Git with Eclipse - creating local repository with EGit in Eclipse. All screenshots below are from Eclipse Kepler.

Adding Files to staging area

Staging area is a new concept introduced by Git. Git has three main states of a file: modified, staged and committed. In a centralized version control system, there are only two states which are modified and committed. In Git, staged means that your file is marked in its current version to go into your next commit snapshot. It is useful when you have a major change in your project like adding a new feature. You cannot finish the work in one goal and you also cannot commit half completed work to the repository. In Git, you can stage your completed changes and continue your work. When you finish the whole implementation of the new feature, you can commit your work and all staged files will be committed in one snapshot. The following diagram shows the relationship of the three states.


To add a file into staging area in EGit, right click on the file and select Team -> Add to Index.


Once the file is added into staging area, a plus symbol will appear on the file and all parent folders of the file will have an asterisk symbol indicating it is staged.


EGit also allows to commit files not staged. In this case, those files will be staged and committed at the same time.

Committing Files to local repository 

Similar to centralized version control system, commit is straightforward. Right click on the project and select Team -> Commit... It will open a new dialog. In the upper textbox, you will have to enter a commit message. In the lower part of the dialog, you can select the files you want to commit. All staged files of the project are selected by default and you can also select staged files from other projects. In my example, the staged file from Project1 is selected by default and I can also select the staged file from Project2. Furthermore, if you click on the Show Untracked Files icon, those files not staged will also be displayed. And you are allowed to select those files. Click Commit button and all selected files will be committed to the local repository.


In Git, You can change your previous commit if you realize your previous commit is incomplete or your commit message needs modification. This is different from centralized version control system and it is a very convenient function to correct mistaken commits. To amend previous commit, click this icon on the right top of the commit message textbox. It will not add a new version to your committed files and your comment message in last commit will be overridden. However, this should only be used if the previous commit has not been pushed to a remote repository.

Reverting Changes 

There are several ways to revert changes in Git. Revert the changes in files or revert the changes in project.

Reverting changes in files

If you want to revert changes in one or more files, select the files and right click to popup the context menu. Select Replace With in the context menu, EGit provides several options to revert. Four of them relate to the local repository, HEAD Revision, Git Index, Previous Revision and Branch, Tag, or Reference...


HEAD Revision: This will replace the contents of the file with the HEAD revision. Any untracked changes and staged changes will be lost.
Git Index: This will replace the contents of the file with the contents in the staging area. Any untracked changes will be lost.
Previous Revision: This will replace the contents of the file with previous revision.
Branch, Tag, or Reference...: This enables you to revert your file to any branch, tag or reference revision.

Furthermore, you can use the Compare With to compare your files with any revision and revert changes line by line.

Reverting changes in project

If you want to revert changes in the whole project, right click on the project and select Team ->Reset... in the context menu. The Reset dialog will be popup. In the upper box, you can select any revision you want to reset to. In the bottom Reset type box, there are three types.

Soft (HEAD updated): This will only reset your current HEAD revision to the revision you select in the upper box. If the revision you selected is the same as your current HEAD revision, you will notice there is no change after reset. The untracked changes and staged changes will be retained.

Mixed (HEAD and index updated): This will do a Soft reset and reset the staging area. After Mixed reset, you will notice all your staged files become untracked. You can imagine as all the changes are removed out of staging area, but they still stay in your working directory.

Hard (HEAD, index, and working directory updated): This will do a Mixed reset and reset your working directory. After Hard reset, your working directory will also be reverted to the revision you selected, which means all uncommitted changes will be lost. You should be careful with Hard reset because you cannot bring your changes back.


There are other use cases of EGit in local repository. For a full guide of EGit usage, please refer to https://wiki.eclipse.org/EGit/User_Guide. For how to interact with remote Git repository in EGit, please read Git with Eclipse (4) - pushing local repositories to remote repositories.


Reference:

Sunday, May 24, 2015

Git with Eclipse (2) - creating local repository with EGit in Eclipse

This post describes how to create a local repository using EGit. For how to configure EGit in Eclipse, please read Git with Eclipse (1) - configuration of EGit in Eclipse. All screenshots below are from Eclipse Kepler.

Create Local Repositories

Compare to centralised version control system SVN or CVS, you can easily create local repositories in Git. It enables you to version your work locally before sharing with other people.

Firstly, you need create a project in the workspace. Then right click on the project and select Team-> Share Project...


Select Git as the repository type and click Next.


In the next window, select your project and click Create button to create a Git repository. You can also tick 'Use or create repository in parent folder of project' to create the repository in the parent folder of the project. But it is not recommended and EGit will not allow if the project is under Eclipse workspace folder like my example in this post. The reason will be discussed later. 

In the popup dialog, specify a directory in Parent  directory. It can be any directory on your disk. But it is a good practice to use the parent directory of Eclipse workspace, because EGit will move the project folder from workspace folder to the repository folder. A new developer might be confused why he could not find the project folder in workspace. By doing this, it is easier to know where is the project folder on the disk. Then give a name of the repository. Click Finish to return to the Configure Git Repository dialog. EGit tells you the projects will be moved from the Current Location to the Target Location in the lower table of the dialog.


The Path within repository enables you to specify a sub folder inside the repository folder, and the projects will be moved to the sub folder you specified. I leave it blank so the project will be in the repository folder. Then click Finish button to create the repository.

Once the repository is created, you will notice a ">" sign appears next to the question mark icon on the project folder and some files are also have a question mark icon on them. The question mark icon means the project folder and all those files are new in the repository. And the ">" sign tells you there is modification inside project folder. You may also notice there is no question mark on the bin folder. It is because the folder has been added in to .gitignore file. All files and folders specified in .gitignore file will be ignored by Git and will not be shared into the repository. The files to be ignored are typically class files and sometimes the project settings files.


Now you are ready to commit your project to the local Git repository. For some basic use cases of EGit, please read Git with Eclipse (3) - basic use cases in EGit with local repository.

Eclipse workspace and repository working directory

Unlike SVN or CVS has to put the repository metadata folder inside the project folder, Git can put its metadata folder .git outside project folder. In my example, the .git folder is under GitRepository folder. I can share more than one projects in this repository and they all use the same .git folder to store the repository metadata.

According to EGit user guide, “it is not a good idea to make a project the root folder of your repository”. Because it will not possible to share more than one project in that repository.

And there are reasons why EGit keeps the repository working directory outside Eclipse workspace.

  • When calculating the changes before committing, only active projects folders will be scanned. Irrelevant folders like .metadata or any inactive projects inside Eclipse workspace will be skipped.
  • If .git folder is inside workspace folder, it is unclear whether Eclipse will do unwanted folder scan on the .git folder.
  • Repository data is independent to the Eclipse workspace.

Reference: