Showing posts with label Technology. Show all posts

Tuesday, December 26, 2017

Continuous delivery practice

Continuous delivery has been discussed for long time in IT industry. Luckily, I got a chance to be involved in the continuous delivery implementation in my company in past three years. And I get some thoughts and insights about how it has been practiced in my company.

Firstly, I do not think there is an universal best practice which suits everyone's need. Depends on the product you deliver to your customer, how sensitive your customer to new features and how much tolerance your customers have against bugs, you will need to choose different ways to implement continuous delivery. For example, if your product is a banking system used internally by banks. The banks do want new features, but they do not need new features next day while they would want the system to be stable as much as possible. In this case, you may want the continuous delivery practice to have more tests to reduce the chance of bugs introduced by new features. If your product is an e-commerce website used by public users. You may want to deliver new features to users as quick as possible to increase the revenue. In this case, you could choose less tests.

Secondly, standardized. It does not matter how do you practice continuous delivery, you must have standards in your organization. Coding style standard, code review standard, continuous integration standard, testing standard, deployment standard, tracking standard, etc. All these have to be setup and agreed in your organization before starting to implement continuous delivery. Without standardized, continuous delivery hardly success from my experience.

Thirdly, choose the right tools. There are a lot of tools to implement continuous delivery in the market, some are good and some are not that good. I do not want to recommend any tool here, as every organization has different requirements and it is your job to choose the right tools. If you cannot find a tool suit you, write your own one.

Now, I will summarize how continuous delivery is implemented in my company.

Standardized

Coding style - We are following Google's Java style. And use SonarQube to control code quality.

CI - We are using Git flow. Develop branch and master branch does not allow direct code push. All code changes require a feature branch or hot fix branch, and pull request is needed in order to merge into develop branch. Code reviews are performed in pull request. Once a pull request is merged into develop branch, develop branch is built on our CI tool and regression tests are triggered to make sure no existing function is broken. Once a release is pushed to production, the release branch is merged into master branch.

Testing - new code require unit test coverage. Integration test is optional. Acceptance test covers critical functions which have direct impacts to user experience.

Deployment - Each team has their own team environment, and deployment is allowed with any code branch. Integration environment only accepts develop branch or release branch deployment (This will make sure integration environment is stable as much as possible). Release Candidate environment only accepts release branch. Production environment only accepts branches from Release Candidate environment. Every engineer can do deployment to team and integration environments. Release Candidate environment does not allow manual deployment, the deployment is performed by our releasing tool automatically when releases are created. Production environment allows manual deployment by a group of software engineers with permissions and operations team. Our releasing tool can also do automatic deployment to production environment.

Tracking - Every commit to code base requires a JIRA ticket. A standard release note is created automatically when a release is created, and all JIRA tickets are collected into the release note for future reference. The name of the person who creates the release, and the person who pushes it to production (if manual deployment is involved) are recorded in the release note for tracking purpose.

Release flow

The flow chart below shows how does a change goes to production in my company.


A change is initially committed to a feature branch and deployed to team environment. Engineer tests the change there and creates pull request for merging the change into develop branch.

Other engineers review the change on the pull request. Once being approved, the feature branch is merged. Develop branch then deployed to integration environment and acceptance tests are triggered.

Once acceptance tests are passed, a release branch can be created from develop branch and then deployed to release candidate environment. Acceptance tests are triggered again.

Once acceptance tests are passed on release candidate environment, the release branch is deployed to production environment.

In the above steps, only the steps when the commit goes to develop branch and release branch are manual, all other steps are automatic. With this automation, ideally, our engineers can push their changes to our customer within one day, comparing to at least one week in old days without this automation.

Tools
The tools we are using are as below. All these tools provide RESTful API, so we integrate them into our own releasing management tool. It gives our engineers a single portal when they want to create a release and push the release to production.

  • Bitbucket is our code repository
  • JIRA is our issue tracking tool
  • Confluence hosts our release note
  • Bamboo is our CI tool
  • We developed our own releasing management tool.
  • Rundeck is used for our production deployment.
When something goes wrong
You may ask, what if something goes wrong. Good question. In the release flow above, there are some steps may fail.

Acceptance tests fail on integration environment - When this happens, release creation is not allowed. As I mentioned in the Tools section, we have developed our own releasing management tool. Our engineers create releases from there. It makes it easy to forbid release creation by disabling the release creation button.

Release creation fail - This should be rarely happen. But when it happens, we revert any actions have been done and displays the error to the release creator. If release branch has been created, we delete it. If release note has been created, we delete it too.

Acceptance tests fail on release candidate environment - The first thing to do when this happens is rollback to the previous version on release candidate environment. Then inform the release creator to investigate the problem. If the failure is caused by the code change and can be fixed with minor efforts, we allow to merge a pull request to release branch and rebuild the release branch. Otherwise, the release has to be cancelled, and new release is not allowed until the failure has been fixed. If the failure is caused by data issue or test itself. Release is allowed to push to production by senior engineers manually with certain permissions. The data issue and test should be fixed afterwards.

Issues found after release is deployed to production - When this happens, it is bad. We have two options. One option is to create a hot fix or patch release, if the issue can be fixed in short time. Another option is to roll back to previous release version. If a rollback happens, anyone involved in this release will have to do a postmortem to find out what we did wrong and how do we prevent it to happen again.

More we can do
At the moment, we rarely do automatic deployment to production. The reason is we do not have a reliable alerting tool to inform us when something goes wrong on production. We still rely on manual check after a release is deployed to production. That is why we formed a new SRE team to take care of our production environment. One of the new team's first priority is creating the alerting tool. When it is ready, we will be able to automate production deployment.

After the production deployment automation,  we can improve our continuous delivery practice by automate release creation. The idea is when a certain number of features have been merged to develop branch (This can be tracked by JIRA ticket), create the release automatically and follow the release flow to production. If this is implemented, we can free our engineers time from releasing, and they can focus on development.

Saturday, June 3, 2017

Content Security Policy (CSP) in Spring

The same origin policy is an important concept in the web application security. The data of https://myweb.com should only be accessed by code from https://myweb.com. And should never be allowed to access by http://evilweb.com.

Cross-site scripting can bypass the same origin policy by injecting malicious script into trusted web sites. If an attacker injects any script which successfully executed, bad things happen like user session could be compromised or sensitive information could be sent to the attacker.

Content Security Policy (CSP) which is supported by modern browsers can reduce the risk of Cross-site scripting significantly.

How it works

So how CSP works? For example, the Google+ follow button (next to my profile picture) on my blog loads and executes code from https://apis.google.com. We know the code is trusted. But browser doesn't know which sources are trusted and which are not.

CSP introduces the Content-Security-Policy HTTP header that allows you to tell the browser which sources are trusted, like a whitelist. Back to the Google+ button example, we can define a policy that accept scripts from https://apis.google.com.

Content-Security-Policy: script-src 'self' https://apis.google.com

As you can tell, script-src is a directive that controls a whitelist of scripts sources. We tell the browser, 'self' which is current page's origin and https://apis.google.com are trusted scripts sources. Scripts from current page's origin and https://apis.google.com are allowed to be executed. Scripts from all other origins should be blocked.

So if unfortunately, an attacker successfully injects a script from http://evilweb.com into your site. Because http://evilweb.com is not in the list of script-src. Instead of loading and executing the script, a modern browser will block the script with an error saying something like "Refused to load the script from 'http://evilweb.com' because it violates the following Content Security Policy directive: script-src 'self' https://apis.google.com".

Directives

Policy applies to a wide variety of resources. A full list of valid directives can be found on W3C Recommendation. And apart from domains, four keywords can be used in the source list.

'self' - matches the current origin, but not its subdomains
'none' - matches nothing, even current origin is not allowed
'unsafe-inline' - allows inline JavaScript and CSS
'unsafe-eval' - allows text-to-JavaScript mechanism

All the above keywords require single quotes.

In order to protect against Cross-site scripting, a web application should include:
  • Both script-src and object-src directives, or
  • A default-src directive
In either case, 'unsafe-inline' or data: should not be included as a valid sources. As both of them enable Cross-site scripting attacks.

By default, directives are accepts everything. So if you don't define any directives, any resources can be loaded and executed by the Browser. You can change the default by define the default-src. For example, let's define the default-src as below.

Content-Security-Policy: default-src 'self' https://google.com

If we don't define a script-src, the browser knows to allow scripts from current page origin and https://google.com only, and blocks scripts from any other origins.

Note the following directives don't use default-src as a fallback. So if they are not defined, it means allowing everything.

  • base-uri
  • form-action
  • frame-ancestor
  • plugin-types
  • report-uri
  • sandbox
For more details about directives, please read W3C Recommendation.

Configuring CSP in Spring

Spring framework provides an easy way to configure CSP by using Spring Security module. Please note Spring Security module doesn't add CSP by default.

To enable CSP header using XML configuration:

<http>
 <!-- ... -->

 <headers>
  <content-security-policy policy-directives="script-src 'self' https://trustedscripts.example.com; object-src https://trustedplugins.example.com;">
         </content-security-policy>
        </headers>
</http>

To enable CSP header using Java configuration:

@EnableWebSecurity
public class WebSecurityConfig extends
WebSecurityConfigurerAdapter {

@Override
protected void configure(HttpSecurity http) throws Exception {
 http
 // ...
 .headers()
  .contentSecurityPolicy("script-src 'self' https://trustedscripts.example.com; object-src https://trustedplugins.example.com; report-uri /csp-report-endpoint/");
}
}

Additional Resources

Wednesday, August 24, 2016

Configure JProfiler 9.2 to profiling applications running in Docker containers

Recently, I worked on a task to address a memory issue in our applications. And I was using JProfiler 9.2 to analyze the memory usage. I run our applications in Docker containers, so I have to attach JProfiler to remote JVM to do the profiling. Below is a step by step guide on how to make JProfiler 9.2 working with Docker. P.S. I'm using a Linux system.

These steps are to be done in Docker containers:

1. Download JProfiler 9.2 in Docker image and expose port 8849 by adding the following lines in the Dockerfile file and rebuild the Docker image.

RUN wget http://download-keycdn.ej-technologies.com/jprofiler/jprofiler_linux_9_2.tar.gz -P /tmp/ &&\
 tar -xzf /tmp/jprofiler_linux_9_2.tar.gz -C /usr/local &&\
 rm /tmp/jprofiler_linux_9_2.tar.gz

ENV JPAGENT_PATH="-agentpath:/usr/local/jprofiler9/bin/linux-x64/libjprofilerti.so=nowait"
EXPOSE 8849

2. Start the Docker container.

As Will Humphreys's comments below. Start your docker container with port 8849 mapped to your host's port 8849.
  docker run -p 8849:8849 imageName

If docker compose is in use. Map port 8849 to the host port 8849  by adding "8849:8849" to the ports section in the docker-compose file.
  
  ports:
      - "8849:8849"

3. Get inside the Docker container by running the command below.

docker exec -it [container-name] bash

4. Start attach mode of JProfiler in the Docker container by running these commands inside the docker container.

cd /usr/local/jrofiler9/
bin/jpenable

JProfiler should promote you to enter the mode and the port. Enter '1' and '8849' as shown in the screen shot below.


Then you should see the JProfiler log information in your application server's log. See example screen shot below.


Alternatively, if you want to enable JProfiler agent at your web server start up and wait for JProfiler GUI connecting from host, instead of putting "ENV JPAGENT_PATH="-agentpath:/usr/local/jprofiler9/bin/linux-x64/libjprofilerti.so=nowait"" in the Dockerfile. Add following line to the JAVA_OPTS. For tomcat, it will be CATALINA_OPTS. Note: the config.xml will be the place to put your JProfiler license key.


JAVA_OPTS="$JAVA_OPTS -agentpath:/usr/local/jprofiler9/bin/linux-x64/libjprofilerti.so=port=8849,wait,config=/usr/local/jprofiler9/config.xml"

Now you are done at the docker container side. The container is ready to be attached to 
your JProfiler GUI. The steps below are to be done on the host machine.


1. Download JProfiler 9.2 from https://www.ej-technologies.com/download/jprofiler/files and install it.
2. Open JProfiler and open a new session by press Ctrl + N or Click 'New Session' in Session menu.
3. Select 'Attach to profiled JVM (local or remote)' in Session Type section. Enter the IP address and 8849 as profiling port in Profiled JVM Settings section. Leave the other settings as default. Then click OK.


If you don't know the IP address of the Docker container, go inside it and type 'ifconfig'. If 'ifconfig' is not found, install it by 'yum -y install net-tools' for centOS system. Or whatever command for the other systems.

4. A Session Startup window should be shown, leave all default settings and click OK.


JProfiler should start to transform classes and connect to your JVM in the Docker container.


Once it finishes the connecting process, you should be able to see the profiling charts showing up.


PS. If you have a license key, the way to enter it to the JProfiler inside docker container is opening $JPROFILER_HOME/config.xml, and insert your key there as below. If config.xml is not existing, copy it from $HOME/.jprofiler9 on your host machine.


  ...

Saturday, June 25, 2016

How to package a Python module

Python is an interesting coding language. It can be used to implement the solution for some simple tasks in very short time. There are many useful modules out there you can use for your task. Below is a simple way to package your Python application as a module. Then you can distribute it and it can be used by others.

It is recommended to organize your Python application in the following project structure

my-project
    ---mypackge
        ---__init__.py
        ---__main__.py
        ---package-data
            ---package.conf
            ---package.txt
        ---mainscript.py
    ---mypackge-runner.py
    ---setup.py


Below is a very simple example of the setup.py script. More details about the setup script are here.

setup.py:
from setuptools import setup, find_packages

setup(
    name='my-project',
    packages=find_packages(),
    description='my python project',
    entry_points={
        "console_scripts": ['mypackage = mypackage.mainscript:main']
    },
    version='1.0.0',
    classifiers=[
        'Development Status :: 4 - Beta',
        'Programming Language :: Python :: 3'],
    install_requires=[
        'requests'
    ],
    package_data={
        'mypackage': ['package-data/package.conf',
                        'package-data/*.txt']
    },
    author='Andrew Liu')


Some important values are explained as below.

1. entry_points

   This is the entry point of your code. "console_scripts" defines which function to execute when your application is called from command line. In the example, it is the main() function in mypackage.mainscript.py.

2. install_requires
   This is to define all the dependencies of your module.
3. package_data
   All other files which are not python file you want to package into your module need to be listed here.

To install your python module
cd path-to-my-project
python setup.py install

To run the package in your project
python -m mypackage
To run the wrapper script
python mypackage-runner.py
To check install 
command -V mypackage
To run as module
mypackage

Wednesday, February 3, 2016

How Java garbage collection works

As a Java developer, we all know JVM provides us an automatic Garbage Collection mechanism. And we don't need to worry about memory allocation and deallocation like in C. But how GC works behind the scene? It would help us to write much better Java applications if we understand that.

There are many articles you can find from Google to dive deep into it, I will only put some GC basics in this blog. Firstly, you might heard a term of "stop-the-world". What does that mean? It means the JVM stops running the application for a GC execution.  During the stop-the-world time, every thread will stop their tasks until the GC thread complete its task.

JVM Generations

In Java, we don't explicitly allocate and deallocate memory in the code. The GC finds those unreferenced objects and removes them. According to an article by Sangmin Lee[1], the GC was designed by following the two hypotheses below.
  • Most objects soon become unreachable.
  • References from old objects to young objects only exist in small numbers.
Therefore, the memory heap is broken into different segments, Java calls them as generations.

Young Generation: All new objects are allocated in Young Generation. When this area is full, GC removes unreachable objects from it. This is called "minor garbage collection" or "minor GC".

Old Generation: When objects survived from Young Generation, they are moved to Old Generation or Tenured Generation. Old Generation has bigger size and GC removes objects less frequently from it. When GC removes objects from Old Generation, it is called "major garbage collection" or "major GC".

Permanent Generation: Permanent Generation contains metadata of classes and methods, so it is also known as "method area". It does not store objects survived from Old Generation. The GC occurs in this area is also considered as "major GC". Some places call a GC as "full GC" if it performs on Permanent Generation.

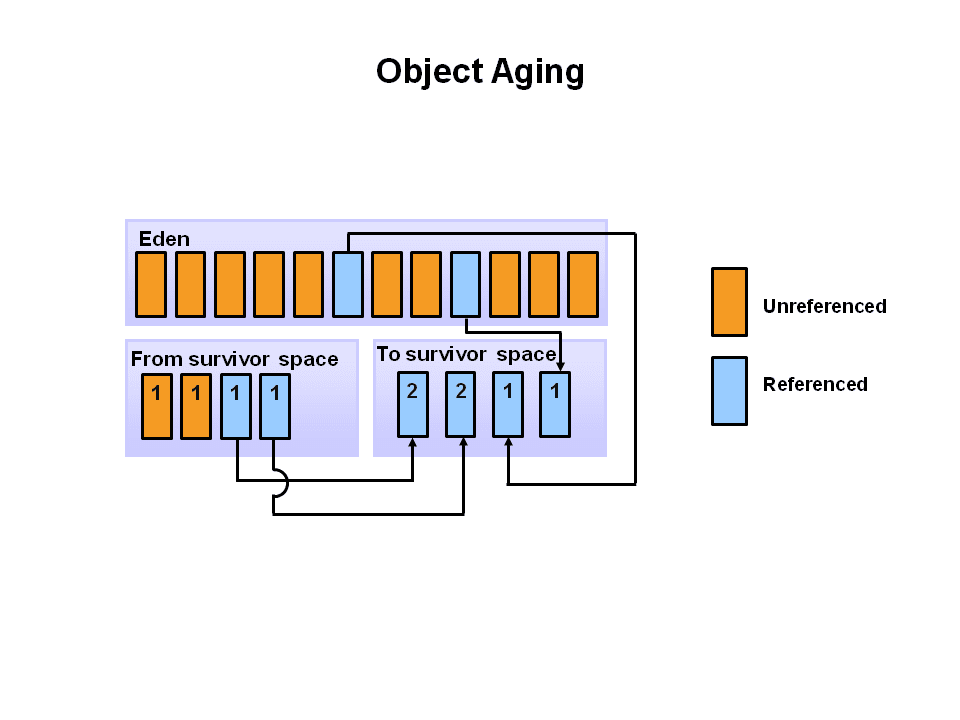
You may notice the Young Generation is divided into a Eden space and two Survivor Spaces. They are used to determine the age of objects and whether to move them to Old Generation.

Generational Garbage Collection

Now, how does the GC process with those different generations in memory heap?
1. New created objects are allocated in Eden space. Two Survivor spaces are empty at the beginning.


2. When Eden space is full, a minor GC occurs. It deletes all unreferenced objects from Eden space and moves referenced objects to the first survivor space (S0). So the Eden space will be empty and new objects can be allocated to it.
3. When Eden space is full again, another minor GC occurs. It deletes all unreferenced objects from Eden space and moves referenced objects. But this time, referenced objects are moved to the second survivor space (S1). In addition, referenced objects in the first survivor space (S0) also get moved to S1 and have their age incremented. Unreferenced objects in S0 also get deleted. So we always have one survivor space empty.
4. The same process repeats in subsequent minor GC with survivor spaces switched.
5. When the aged objects in survivor spaces reach a threshold, they are moved to Old Generation.
6. When the Old Generation is full, a major GC will be performed to delete the unreferenced objects in Old Generation and compact the referenced objects.

The above steps are a quick overview of the GC in the Young Generation. The major GC process is different among different GC types. Basically, there are 5 GC types.
1. Serial GC
2. Parallel GC
3. Parallel Compacting GC
4. CMS GC
5. G1 GC

The 5 GC types can be switched using different command lines, like -XX:+UseG1GC will set the GC type to G1 GC.

Monitor Java Garbage Collection

There are several ways to monitor GC. I will list some most commonly used ones below.

jstat

jstat is in $JAVA_HOME/bin. You can run it by "jstat -gc <vmid> 1000". vmid is the virtual machine identifier. It is normally the process id of the JVM. 1000 means display the GC data every 1 second. The meaning of the output columns can be found here.

VisualVM

Visual VM is a GUI tool provided by Oracle. It can be downloaded from here.

GarbageCollectorMXBean and GarbageCollectionNotificationInfo

GarbageCollectorMXBean and GarbageCollectionNotificationInfo can be used to collect GC data in a programming way. An example can be found from here in my GitHub. You can use "mvn jetty:run" to start a jetty server and observe the GC information like below.
Minor GC: - 61 (Allocation Failure) start: 2016-02-03 22:22:17.784, end: 2016-02-03 22:22:17.789
        [Eden Space] init:4416K; used:19.2%(13440K) -> 0.0%(0K); committed: 19.2%(13440K) -> 19.2%(13440K)
        [Code Cache] init:160K; used:14.7%(4823K) -> 14.7%(4823K); committed: 14.7%(4832K) -> 14.7%(4832K)
        [Survivor Space] init:512K; used:16.7%(1456K) -> 13.3%(1162K); committed: 19.1%(1664K) -> 19.1%(1664K)
        [Metaspace] init:0K; used:19393K -> 19393K); committed: 19840K -> 19840K)
        [Tenured Gen] init:10944K; used:18.6%(32621K) -> 19.2%(33563K); committed: 19.0%(33360K) -> 19.2%(33616K)
duration:5ms, throughput:99.9%, collection count:61, collection time:213

Major GC: - 6 (Allocation Failure) start: 2016-02-03 22:22:17.789, end: 2016-02-03 22:22:17.839
        [Eden Space] init:4416K; used:0.0%(0K) -> 0.0%(0K); committed: 19.2%(13440K) -> 19.2%(13440K)
        [Code Cache] init:160K; used:14.7%(4823K) -> 14.7%(4823K); committed: 14.7%(4832K) -> 14.7%(4832K)
        [Survivor Space] init:512K; used:13.3%(1162K) -> 0.0%(0K); committed: 19.1%(1664K) -> 19.1%(1664K)
        [Metaspace] init:0K; used:19393K -> 19393K); committed: 19840K -> 19840K)
        [Tenured Gen] init:10944K; used:19.2%(33563K) -> 14.0%(24559K); committed: 19.2%(33616K) -> 19.2%(33616K)
duration:50ms, throughput:99.6%, collection count:6, collection time:228

Or you can run the GCMonitor class as a java application. It would take long time to finish the execution until a major GC occurs.

Reference:
[1] http://www.cubrid.org/blog/dev-platform/understanding-java-garbage-collection/
[2] http://www.oracle.com/webfolder/technetwork/tutorials/obe/java/gc01/index.html

Sunday, October 18, 2015

Jackson serialization of Map Polymorphism with Spring MVC

I come across a problem of serializing Map type objects polymorphism when I re-engineering a legacy code. Spring MVC and Jackson are used in the RESTful API implementation. The problem is I have a list of Map type objects and they are in different implementation of Map. I want to serialize and deserialize the list with the actual type of each Map instance. For example, I have a list of map as below. One map is a HashMap and the other map is Hashtable.


List<Map> maps = new LinkedList<>();

Map<String, String> map1 = new HashMap();
Map<String, String> map2 = new Hashtable();

maps.add(map1);
maps.add(map2);

With Jackson's default settings, the type information of map1 and map2 will be lost after serialization. And they both will be LinkedHashMap after deserialization which makes sense to Jackson because it doesn't know the actual type of map1 and map2 in deserilaization. Jackson does provide a @JsonTypeInfo annotation to resolve the polymorphism problem, but it only applies to the values of the map, not the map itself.


After several days search online, the best solution I found so far is to customize the TypeResolverBuilder class used by Jackson's ObjectMapper instance. However, it requires both server and client side to set the customized TypeResolverBuilder to the ObjectMapper instance, which means if your RESTful API is exposed to the public, you have to provide your clients with the customized ObjectMapper class. I know it is not ideal, so if you have a better solution, please let me know. 

Now, the solution!

Firstly, write our own TypeResolverBuilder class. The important part is the useForType method. We override the method to return true if the type is a map like type.


public class MapTypeIdResolverBuilder extends StdTypeResolverBuilder {

    public MapTypeIdResolverBuilder() {
    }

    @Override
    public TypeDeserializer buildTypeDeserializer(DeserializationConfig config,
                                                  JavaType baseType, Collection<NamedType> subtypes) {
        return useForType(baseType) ? super.buildTypeDeserializer(config, baseType, subtypes) : null;
    }

    @Override
    public TypeSerializer buildTypeSerializer(SerializationConfig config,
                                              JavaType baseType, Collection<namedtype> subtypes) {
        return useForType(baseType) ? super.buildTypeSerializer(config, baseType, subtypes) : null;
    }

    /**
     * Method called to check if the default type handler should be
     * used for given type.
     * Note: "natural types" (String, Boolean, Integer, Double) will never
     * use typing; that is both due to them being concrete and final,
     * and since actual serializers and deserializers will also ignore any
     * attempts to enforce typing.
     */
    public boolean useForType(JavaType t) {
        return t.isMapLikeType() || t.isJavaLangObject();
    }
}


Then, we need to set it to the ObjectMapper instance used by Jackson. We will also have to call init and inclusion methods, otherwise exceptions will be thrown at runtime. It is not required to use JsonTypeInfo.Id.CLASS and JsonTypeInfo.As.PROPERTY, you can use whatever you want provided by JsonTypeInfo annotation.

ObjectMapper objectMapper = new ObjectMapper();
MapTypeIdResolverBuilder mapResolverBuilder = new MapTypeIdResolverBuilder();
mapResolverBuilder.init(JsonTypeInfo.Id.CLASS, null);
mapResolverBuilder.inclusion(JsonTypeInfo.As.PROPERTY);
objectMapper.setDefaultTyping(mapResolverBuilder);


As I said earlier, both client side and server side of our RESTful API need to use the above ObjectMapper instance to do the serialization and deserialization. Because I am using Spring MVC. So I have to register the ObjectMapper instance to the MappingJackson2HttpMessageConverter used by Spring. If you are using a different framework with Jackson, it should provide a way to set the customized ObjectMapper instance, hopefully. 

I will use the Java config instead of XML config in Spring. If you are using XML config, you can set the customized ObjectMapper instance as below, but it would be a bit tricky of how to call the init and inclusion methods in the ObjectMapper bean.

<mvc:annotation-driven>
        <mvc:message-converters>
            <bean class="org.springframework.http.converter.json.MappingJackson2HttpMessageConverter">
                <property name="objectMapper" ref="customObjectMapper"/>
            </bean>
        </mvc:message-converters>
</mvc:annotation-drive>


The Java config I am using at server side is as below.

@Configuration
@EnableWebMvc
@ComponentScan("com.geekspearls.mvc.jackson.server")
public class AppConfig extends WebMvcConfigurerAdapter {

    @Override
    public void configureDefaultServletHandling(DefaultServletHandlerConfigurer configurer) {
        configurer.enable();
    }

    @Override
    public void configureMessageConverters(List<HttpMessageConverter<?>> converters) {
        converters.add(converter());
    }

    @Bean
    public MappingJackson2HttpMessageConverter converter() {
        MappingJackson2HttpMessageConverter converter = new MappingJackson2HttpMessageConverter();
        converter.setObjectMapper(objectMapper());
        return converter;
    }

    @Bean
    public ObjectMapper objectMapper() {
        ObjectMapper objectMapper = new ObjectMapper();
        MapTypeIdResolverBuilder mapResolverBuilder = new MapTypeIdResolverBuilder();
        mapResolverBuilder.init(JsonTypeInfo.Id.CLASS, null);
        mapResolverBuilder.inclusion(JsonTypeInfo.As.PROPERTY);
        objectMapper.setDefaultTyping(mapResolverBuilder);
        return objectMapper;
    }
}


Then the client side class is as below. I am using the RestTemplate to call the RESTful service for simplicity.

public class ServiceConsumer {

    private static final String REST_ENDPOINT = "http://localhost:8080/rest/api";

    public InStock getInStock() {

        ObjectMapper objectMapper = new ObjectMapper();
        MapTypeIdResolverBuilder mapResolverBuilder = new MapTypeIdResolverBuilder();
        mapResolverBuilder.init(JsonTypeInfo.Id.CLASS, null);
        mapResolverBuilder.inclusion(JsonTypeInfo.As.PROPERTY);
        objectMapper.setDefaultTyping(mapResolverBuilder);

        List<HttpMessageConverter<?>> converters = new ArrayList<>();
        MappingJackson2HttpMessageConverter jackson2HttpMessageConverter = new MappingJackson2HttpMessageConverter();
        jackson2HttpMessageConverter.setObjectMapper(objectMapper);
        converters.add(jackson2HttpMessageConverter);
        RestOperations operations = new RestTemplate(converters);
        InStock s = operations.getForObject(REST_ENDPOINT + "/book/in_stock", InStock.class);
        return s;
    }
}


The complete code example can be found in my GitHub in the mvc.jackson package. The example can be run in jetty server via 'mvn jetty:run' command. And you will get the following JSON message when hit the server with URL 'http://localhost:8080/rest/api/book/in_stock in the browser. As you can see, it contains the type information of the maps `"@class": "java.util.Hashtable"` and `"@class": "java.util.HashMap"`.

{
  "store": "Los Angeles Store",
  "books": [
    {
      "@class": "com.geekspearls.mvc.jackson.server.model.ChildrenBook",
      "title": "Giraffes Can't Dance",
      "isbn": "1-84356-568-3",
      "properties": {
        "@class": "java.util.Hashtable",
        "Price": [
          "java.lang.Float",
          4.42
        ],
        "Type": "Board book",
        "Currency": "USD",
        "Pages": 10
      },
      "minAge": 3,
      "maxAge": 0
    },
    {
      "@class": "com.geekspearls.mvc.jackson.server.model.TextBook",
      "title": "Database Systems",
      "isbn": "1-84356-028-3",
      "properties": {
        "@class": "java.util.HashMap",
        "Pages": 560,
        "Type": "HardCover",
        "Price": [
          "java.lang.Float",
          146.16
        ],
        "Currency": "USD"
      },
      "subject": "Computer Science"
    }
  ]
}


By running the RestTest unit test provided in the example, you will get the following result. The first properties map is in Hashtable type and the second one is in HashMap type.

Store ->Los Angeles Store
book@com.geekspearls.mvc.jackson.server.model.ChildrenBook
Title: Giraffes Can't Dance
ISBN: 1-84356-568-3
Properties@java.util.Hashtable
Price -> 4.42@java.lang.Float
Currency -> USD@java.lang.String
Type -> Board book@java.lang.String
Pages -> 10@java.lang.Integer
Min Age: 0
Max Age: 3
=======================================
book@com.geekspearls.mvc.jackson.server.model.TextBook
Title: Database Systems
ISBN: 1-84356-028-3
Properties@java.util.HashMap
Pages -> 560@java.lang.Integer
Type -> HardCover@java.lang.String
Price -> 146.16@java.lang.Float
Currency -> USD@java.lang.String
Subject: Computer Science
=======================================

Sunday, August 16, 2015

Spring + Quartz integration example (3) - inject Spring bean into Quartz job instance

In my work of integrating Quartz scheduler with Spring. There is a requirement to pass an object into the Quartz job instance. The object is a Spring bean. I found because the Quartz job instance is created by Quartz thread and it doesn't aware of Spring context, so I couldn't use the Spring bean in the job class directly, it is always null. After googling it a bit, I found three ways to do that. 1. Pass the object into JobDataMap, 2. get it from Spring application context and 3. use Spring to inject the object. Personally, I vote for the third way as the best practice.


1. Passing the object into JobDataMap

This is the easiest way, what we have to do is letting our class implement Serializeble interface. Then the object can be simply passed into the Quartz JobDataMap. However, there is a flaw in this method. If you use a persistent JobStore, the object in it will be serialized. And you will get a class-versioning error if your class definition is changed in future. Quartz recommends only pass primitive and String into JobDataMap. For details, see Quartz lesson 3.

Put object into JobDataMap

   <bean id="object" class="com.package.MyObject"/>  
   <bean class="org.springframework.scheduling.quartz.JobDetailFactoryBean">  
     <property name="jobClass" value="com.package.MyJob"/>  
     <property name="jobDataAsMap">  
       <map>  
         <entry key="myObject" value-ref="object"/>  
       </map>  
     </property>  
     <property name="durability" value="true"/>  
   </bean>

Retrieve object in Quartz job class

...
MyObject obj = jobExecutionContext.getMergedJobDataMap().getString("myObject");
...
>

2. Using Spring application context

In this way, we have to define an application context key in the scheduler bean.
<bean id="scheduler"  
      class="org.springframework.scheduling.quartz.SchedulerFactoryBean">  
     <property name="applicationContextSchedulerContextKey" value="applicationContext"/>  
     <property name="jobDetails">  
       <list>
          ...  
       </list>  
     </property>  
     <property name="triggers">  
       <list>
         ...  
       </list>  
     </property>  
   </bean>
Then in the job class, we can get the Spring application context as below and retrieve any bean via the bean name.
try {
            ApplicationContext context =
                    (ApplicationContext) jobExecutionContext.getScheduler().getContext().get("applicationContext");
            if (context != null) {
                InjectObject obj = (InjectObject) context.getBean("geeksPearls");
                if (obj != null) {
                    System.out.println("[" + new Date() + "] I am saying hello from a Quartz job, " + obj);
                }
            }
        } catch (SchedulerException e) {
            e.printStackTrace();
        }
The completed example can be found on my GitHub Example3. Have a look at InjectTask class and the Spring context XML.


3. Using Spring injection

We can also use Spring injection to inject any object into our job. However, we have to do a bit more work. I found this way in this blog. And I think it's elegant and the Spring guys should use it as the default way.

Firstly, extend the SpringBeanJobFactory class as below.
public class AutowiringSpringBeanJobFactory extends SpringBeanJobFactory implements ApplicationContextAware {

    private transient AutowireCapableBeanFactory beanFactory;

    public void setApplicationContext(final ApplicationContext applicationContext) throws BeansException {
        beanFactory = applicationContext.getAutowireCapableBeanFactory();
    }

    @Override
    protected Object createJobInstance(final TriggerFiredBundle bundle) throws Exception {
        final Object job = super.createJobInstance(bundle);
        beanFactory.autowireBean(job);
        return job;
    }
}
Secondly, override the default jobFactory in Spring's SchedulerFactoryBean.
<bean id="autoWireScheduler"  
      class="org.springframework.scheduling.quartz.SchedulerFactoryBean">  
     <property name="jobFactory" >  
       <bean class="com.geekspearls.quartz.example3.AutowiringSpringBeanJobFactory"/>  
     </property>  
     <property name="jobDetails">  
       <list>  
         <ref bean="injectJob2"/>  
       </list>  
     </property>  
     <property name="triggers">  
       <list>  
         <ref bean="simpleTrigger2"/>  
       </list>  
     </property>  
   </bean>
Then we can autowire any object into Quartz job class.
public class AnotherInjectTask extends QuartzJobBean {

    @Autowired
    private InjectObject injectObject;

    @Override
    protected void executeInternal(JobExecutionContext jobExecutionContext) throws JobExecutionException {
        System.out.println("[" + new Date() + "] I am saying another hello from a Quartz job, " +
                injectObject);
    }

    public void setInjectObject(InjectObject injectObject) {
        this.injectObject = injectObject;
    }
}
Be aware that in order to use the autowire annotation of Spring. Add either <context:annotation-config> or <context:componentscan> in the Spring context XML file. A completed example can be found on my GitHub Example3. Have a look at AnotherInjectTask and the Spring context XML.

In the example, if we run Example3 class as java application. We can see the following output in the console.
...
[Sun Aug 16 16:46:12 AEST 2015] I am saying hello from a Quartz job, GeeksPearls
[Sun Aug 16 16:46:12 AEST 2015] I am saying another hello from a Quartz job, null
[Sun Aug 16 16:46:12 AEST 2015] I am saying another hello from a Quartz job, GeeksPearls
...
The first line is output by the job using the Spring application context way. The second line is output by the job using the default Spring SchedulerFactoryBean. You can see the object is not injected so it outputs null. The third line is output by the job using our AutowiringSpringBeanJobFactory, you can see the object is injected successfully. Enjoy!

Sunday, August 9, 2015

Spring + Quartz integration example (2) - schedule jobs dynamically

Sometimes, we need schedule jobs dynamically. This requires us to use Quartz scheduler in a programming way rather than a static XML configuration way. I'll show in this post about how to do it with a simple example.


Environment

Java 8
Maven 3
Spring 3.2.3
Quartz 2.2.2
SFL4J 1.7.9 (to show Quartz start up information)


Scenario

We need schedule a report generation task for different departments in an organisation. The task is doing the same thing for different departments but needs to be run at different time, and it collects different data from database for different departments. Suppose sales department's report is to be generated at 7:00 am everyday, marketing department's report is to be generated at 8:00 am on Monday every week and engineering department's report is to be generated at 6:00 pm on the last Friday of every month.

It would be a little difficult to configure the tasks in Spring XML file, because it would be tricky to tell the XML file which department it is. Fortunately, Quartz allows us to use a programming way to schedule the task dynamically.


Implementation

The project configuration is as below.
   <dependencies>  
     <dependency>  
       <groupId>org.springframework</groupId>  
       <artifactId>spring-core</artifactId>  
       <version>${spring.version}</version>  
     </dependency>  
     <dependency>  
       <groupId>org.springframework</groupId>  
       <artifactId>spring-context-support</artifactId>  
       <version>${spring.version}</version>  
     </dependency>  
     <!-- Transaction dependency is required with Quartz integration -->  
     <dependency>  
       <groupId>org.springframework</groupId>  
       <artifactId>spring-tx</artifactId>  
       <version>${spring.version}</version>  
     </dependency>  
     <!-- Quartz framework -->  
     <dependency>  
       <groupId>org.quartz-scheduler</groupId>  
       <artifactId>quartz</artifactId>  
       <version>${quartz.version}</version>  
     </dependency>  
     <dependency>  
       <groupId>org.slf4j</groupId>  
       <artifactId>slf4j-api</artifactId>  
       <version>${slf4j.version}</version>  
     </dependency>  
     <dependency>  
       <groupId>org.slf4j</groupId>  
       <artifactId>slf4j-simple</artifactId>  
       <version>${slf4j.version}</version>  
     </dependency>  
   </dependencies>  
   <properties>  
     <spring.version>3.2.3.RELEASE</spring.version>  
     <quartz.version>2.2.1</quartz.version>  
     <slf4j.version>1.7.9</slf4j.version>  
   </properties>
To make it simple here, the task is just print out an information on the console. The task class is as below. the department name is retrieved from the JobDataMap and can be used in the report generation.
public class GenerateReportTask extends QuartzJobBean {

    public static final String DEPARTMENT = "DEPARTMENT";

    @Override
    protected void executeInternal(JobExecutionContext jobExecutionContext) throws JobExecutionException {
        JobDataMap dataMap = jobExecutionContext.getMergedJobDataMap();
        String department = dataMap.getString(DEPARTMENT);
        System.out.println("[" + new Date() + "] Generating report for department " + department);
    }
}
A QuartzScheduler class is used to schedule the task dynamically. The schedule CRON expressions are stored in a schedules map and the map is initialised in init() method. The init() method will be called when Spring initialise the QuartzScheduler bean.

public class QuartzScheduler {

    private Department[] departments = {Department.ENGINEER, Department.MARKETING, Department.SALES};
    private Map schedules = new HashMap();

    public void init() {
        schedules.put(Department.ENGINEER, "0 0 6 ? * 6L");
        schedules.put(Department.MARKETING, "0 0 8 ? * 2");
        schedules.put(Department.SALES, "0 0 7 * * ?");

        for (Department department : departments) {
            schedule(department);
        }
    }

    private enum Department {
        SALES, MARKETING, ENGINEER
    }
}
In the QuartzScheduler class, an instance of org.quartz.Scheduler class will be injected by Spring, it is the real Quartz scheduler to schedule the tasks. And the schedule() method is using Quartz's static method newJob() and newTrigger() to create the jobDetail and Trigger instances, then add the trigger to the scheduler. You might notice that we put the department name into the JobDataMap. As mentioned above, the department name will be used in the GenerateReportTask class.

public class QuartzScheduler {
    private Scheduler scheduler;    
    ...
    private void schedule(Department department) {
        JobDetail job = newJob(GenerateReportTask.class)
                .withIdentity(department.toString(), "reportgen")
                .build();
        job.getJobDataMap().put(GenerateReportTask.DEPARTMENT, department.toString());
        Trigger trigger = newTrigger()
                .withIdentity(department.toString(), "reportgen")
                .withSchedule(cronSchedule(schedules.get(department)))
                .forJob(job).build();
        try {
            scheduler.scheduleJob(job, trigger);
        } catch (SchedulerException e) {
            e.printStackTrace();
        }
    }
    ...
}
Finally, the Spring XML configuration file contains the bean definition of the QuartzScheduler class and the Spring SchedulerFactoryBean bean to create the real Quartz scheduler instance.
<beans xmlns="http://www.springframework.org/schema/beans"  
     xmlns:xsi="http://www.w3.org/2001/XMLSchema-instance"  
     xsi:schemaLocation="http://www.springframework.org/schema/beans http://www.springframework.org/schema/beans/spring-beans-3.2.xsd">  
   <bean id="quartzScheduler"  
      class="com.geekspearls.quartz.example2.QuartzScheduler"  
       init-method="init">  
     <property name="scheduler" ref="scheduler"/>  
   </bean>  
   <bean id="scheduler"  
      class="org.springframework.scheduling.quartz.SchedulerFactoryBean"/>  
 </beans>
And the Java application class to test our code.
public class Example2 {

    public static void main(String[] args) {
        ApplicationContext context = new ClassPathXmlApplicationContext("applicationContext-quartz2.xml");
        System.out.println("Application started [" + new Date() + "] ");
    }
}
A complete code can be found on my GitHub here. In order to demo the example, I put the schedules a much shorter period as below.
        schedules.put(Department.ENGINEER, "10 * * * * ?");
        schedules.put(Department.MARKETING, "30 * * * * ?");
        schedules.put(Department.SALES, "50 * * * * ?");
Run the Example2 class as a Java application and you can see the tasks are running at scheduled time on the console. I hope you enjoy it.

Saturday, July 25, 2015

Spring 3.2.3 + Quartz 2.2.1 integration example (1) - configuration in Spring context XML

Recently, I am assigned a task of integrating Quartz into a Spring project. I find it's quite an interesting job and would like to share some of my findings.

Quartz is a very popular scheduling library and is used in many Java applications to run jobs. It is open source, simple to use and most importantly, it is free. Here is the Quartz website Quartz Scheduler.

In this post, I'd share how to integrate Quartz into Spring. And how to schedule some simple jobs using Spring's JobDetailFactory and MethodInvokingJobDetailFactory in a simple trigger and CRON trigger respectively.

Environment

Java 8
Maven 3
Spring 3.2.3
Quartz 2.2.2
SFL4J 1.7.9 (to show Quartz start up information)

Project configuration

Create a new Maven project and add the following dependencies to the pom file (Assume Java 8 and Maven 3 have already been installed).
   <dependencies>  
     <dependency>  
       <groupId>org.springframework</groupId>  
       <artifactId>spring-core</artifactId>  
       <version>${spring.version}</version>  
     </dependency>  
     <dependency>  
       <groupId>org.springframework</groupId>  
       <artifactId>spring-context-support</artifactId>  
       <version>${spring.version}</version>  
     </dependency>  
     <!-- Transaction dependency is required with Quartz integration -->  
     <dependency>  
       <groupId>org.springframework</groupId>  
       <artifactId>spring-tx</artifactId>  
       <version>${spring.version}</version>  
     </dependency>  
     <!-- Quartz framework -->  
     <dependency>  
       <groupId>org.quartz-scheduler</groupId>  
       <artifactId>quartz</artifactId>  
       <version>${quartz.version}</version>  
     </dependency>  
     <dependency>  
       <groupId>org.slf4j</groupId>  
       <artifactId>slf4j-api</artifactId>  
       <version>${slf4j.version}</version>  
     </dependency>  
     <dependency>  
       <groupId>org.slf4j</groupId>  
       <artifactId>slf4j-simple</artifactId>  
       <version>${slf4j.version}</version>  
     </dependency>  
   </dependencies>  
   <properties>  
     <spring.version>3.2.3.RELEASE</spring.version>  
     <quartz.version>2.2.1</quartz.version>  
     <slf4j.version>1.7.9</slf4j.version>  
   </properties>

Quartz job and trigger configuration

The first job class simply print a greeting message. I print the date time at the beginning of the greeting so we can know when the job is triggered by Quartz.

public class HelloWorldTask {

    public void sayHello() {
        System.out.println("[" + new Date() + "] Hello from Quartz! World");
    }
}
Then let's schedule the job into Quartz. Firstly, we need configure the JobDetail bean in Spring context file. We'll use the MethodInvokingJobDetailFacrotyBean, it allows to specify which class and which method in the class to run when the job is triggered. For details about MethodInvokingJobDetailFacrotyBean, please read the Spring docs.

   <bean id="helloWorldTask" class="com.geekspearls.quartz.task.HelloWorldTask"/>
   
   <bean id="helloWorldJob"  
      class = "org.springframework.scheduling.quartz.MethodInvokingJobDetailFactoryBean">  
     <property name="targetObject" ref="helloWorldTask"/>  
     <property name="targetMethod" value="sayHello"/>  
   </bean>

Secondly, we need to add our job to a trigger. We will use the SimpleTriggerFactoryBean to schedule our first job and set the job to be run every 5 seconds and delay 1 second to start. For details about SimpleTriggerFactoryBean, please read the Spring docs.

  <bean id="simpleTrigger"  
      class="org.springframework.scheduling.quartz.SimpleTriggerFactoryBean">  
     <property name="jobDetail" ref="helloWorldJob" />  
     <property name="repeatInterval" value="5000" />  
     <property name="startDelay" value="1000" />  
   </bean>  

Then let's create our second job. The second job class extends QuartzJobBean interface. When it is triggered, executeInternal method will be invoked. Inside the method, it takes the value of 'name' from JobDataMap which we set in the jobDetails configuration and print a greeting message. The date time will also be printed out so we can know when the job is triggered.

public class SayHelloTask extends QuartzJobBean {
    @Override
    protected void executeInternal(JobExecutionContext jobExecutionContext) throws JobExecutionException {
        String name = jobExecutionContext.getMergedJobDataMap().getString("name");
        System.out.println("[" + new Date() + "] Hello from Quartz! " + name);
    }
}

For our second job, we will use the JobDetailFactoryBean to configure it in Spring context file and pass in a value of 'name' into jobDataMap.
  <bean id="sayHelloJob"  
      class="org.springframework.scheduling.quartz.JobDetailFactoryBean">  
     <property name="jobClass" value="com.geekspearls.quartz.task.SayHelloTask"/>  
     <property name="jobDataAsMap">  
       <map>  
         <entry key="name" value="Geek's pearls reader"/>  
       </map>  
     </property>  
     <property name="durability" value="true"/>  
   </bean> 

Then we schedule this job with CronTriggerFactoryBean. It is scheduled to run every 10 seconds start from every 0 second. For details about CRON, please read Quartz CronTrigger Tutorial
  <bean id="cronTrigger"  
      class="org.springframework.scheduling.quartz.CronTriggerFactoryBean">  
     <property name="jobDetail" ref="sayHelloJob" />  
     <property name="cronExpression" value="0/10 * * * * ?"/>  
   </bean> 

Now, we have our jobs and triggers ready. Let's add them into Quartz scheduler.
   <bean class="org.springframework.scheduling.quartz.SchedulerFactoryBean">  
     <property name="jobDetails">  
       <list>  
         <ref bean="helloWorldJob" />  
         <ref bean="sayHelloJob" />  
       </list>  
     </property>  
     <property name="triggers">  
       <list>  
         <ref bean="simpleTrigger" />  
         <ref bean="cronTrigger" />  
       </list>  
     </property>  
   </bean>

Finally, everything is ready. The completed Spring context XML file is below.
   <beans xmlns="http://www.springframework.org/schema/beans"  
     xmlns:xsi="http://www.w3.org/2001/XMLSchema-instance"  
     xsi:schemaLocation="http://www.springframework.org/schema/beans http://www.springframework.org/schema/beans/spring-beans-3.2.xsd">  
   <bean id="sayHelloJob"  
      class="org.springframework.scheduling.quartz.JobDetailFactoryBean">  
     <property name="jobClass" value="com.geekspearls.quartz.task.SayHelloTask"/>  
     <property name="jobDataAsMap">  
       <map>  
         <entry key="name" value="Geek's pearls reader"/>  
       </map>  
     </property>  
     <property name="durability" value="true"/>  
   </bean>  
   <bean id="helloWorldTask" class="com.geekspearls.quartz.task.HelloWorldTask"/>  
   <bean id="helloWorldJob"  
      class = "org.springframework.scheduling.quartz.MethodInvokingJobDetailFactoryBean">  
     <property name="targetObject" ref="helloWorldTask"/>  
     <property name="targetMethod" value="sayHello"/>  
   </bean>  
   <bean id="simpleTrigger"  
      class="org.springframework.scheduling.quartz.SimpleTriggerFactoryBean">  
     <property name="jobDetail" ref="helloWorldJob" />  
     <property name="repeatInterval" value="5000" />  
     <property name="startDelay" value="1000" />  
   </bean>  
   <bean id="cronTrigger"  
      class="org.springframework.scheduling.quartz.CronTriggerFactoryBean">  
     <property name="jobDetail" ref="sayHelloJob" />  
     <property name="cronExpression" value="0/10 * * * * ?"/>  
   </bean>  
   <bean class="org.springframework.scheduling.quartz.SchedulerFactoryBean">  
     <property name="jobDetails">  
       <list>  
         <ref bean="helloWorldJob" />  
         <ref bean="sayHelloJob" />  
       </list>  
     </property>  
     <property name="triggers">  
       <list>  
         <ref bean="simpleTrigger" />  
         <ref bean="cronTrigger" />  
       </list>  
     </property>  
   </bean>  
 </beans>

Now, let's test it! Run the following class as Java application.
public class HelloWorld {
    public static void main(String[] args) {
        ApplicationContext context = new ClassPathXmlApplicationContext("applicationContext.xml");
        System.out.println("Application started [" + new Date() + "]");
    }
}

In the log and console output, we can see the information below. Firstly, it tells us a Quartz scheduler with instanceId 'NON_CLUSTER' running locally with 10 threads. And it doesn't support persistence and cluster. I will share how to use clustered Quartz scheduler in my next post.
[main] INFO org.quartz.core.QuartzScheduler - Scheduler meta-data: Quartz Scheduler (v2.2.1) 'org.springframework.scheduling.quartz.SchedulerFactoryBean#0' with instanceId 'NON_CLUSTERED'
  Scheduler class: 'org.quartz.core.QuartzScheduler' - running locally.
  NOT STARTED.
  Currently in standby mode.
  Number of jobs executed: 0
  Using thread pool 'org.quartz.simpl.SimpleThreadPool' - with 10 threads.
  Using job-store 'org.quartz.simpl.RAMJobStore' - which does not support persistence. and is not clustered.

Then we can see the application is started at 17:14:23. 1 second later, our first job is triggered and repeated every 5 seconds. At 17:14:30, our second job is triggered and repeated every 10 seconds. That's what we expected! The completed example can be found on my GitHub here. I hope you will enjoy it!
Application started [Sat Jul 25 17:14:23 AEST 2015]
[Sat Jul 25 17:14:24 AEST 2015] Hello from Quartz! World
[Sat Jul 25 17:14:29 AEST 2015] Hello from Quartz! World
[Sat Jul 25 17:14:30 AEST 2015] Hello from Quartz! Geek's pearls reader
[Sat Jul 25 17:14:34 AEST 2015] Hello from Quartz! World
[Sat Jul 25 17:14:39 AEST 2015] Hello from Quartz! World
[Sat Jul 25 17:14:40 AEST 2015] Hello from Quartz! Geek's pearls reader
[Sat Jul 25 17:14:44 AEST 2015] Hello from Quartz! World
[Sat Jul 25 17:14:49 AEST 2015] Hello from Quartz! World
[Sat Jul 25 17:14:50 AEST 2015] Hello from Quartz! Geek's pearls reader
[Sat Jul 25 17:14:54 AEST 2015] Hello from Quartz! World
[Sat Jul 25 17:14:59 AEST 2015] Hello from Quartz! World
[Sat Jul 25 17:15:00 AEST 2015] Hello from Quartz! Geek's pearls reader
[Sat Jul 25 17:15:04 AEST 2015] Hello from Quartz! World
[Sat Jul 25 17:15:09 AEST 2015] Hello from Quartz! World
[Sat Jul 25 17:15:10 AEST 2015] Hello from Quartz! Geek's pearls reader
[Sat Jul 25 17:15:14 AEST 2015] Hello from Quartz! World
[Sat Jul 25 17:15:19 AEST 2015] Hello from Quartz! World
[Sat Jul 25 17:15:20 AEST 2015] Hello from Quartz! Geek's pearls reader
[Sat Jul 25 17:15:24 AEST 2015] Hello from Quartz! World
[Sat Jul 25 17:15:29 AEST 2015] Hello from Quartz! World
[Sat Jul 25 17:15:30 AEST 2015] Hello from Quartz! Geek's pearls reader
[Sat Jul 25 17:15:34 AEST 2015] Hello from Quartz! World
[Sat Jul 25 17:15:39 AEST 2015] Hello from Quartz! World
[Sat Jul 25 17:15:40 AEST 2015] Hello from Quartz! Geek's pearls reader
...